As iPhone is the most popular smartphone, Apple provides many powerful apps on iPhone. Notes app is one of them. People love to save a shopping list, useful website links and important information in Notes to avoid losing any details soon. Now you can even take a photo or draw a picture in Notes to keep your ideas. But when you want to backup Notes from iPhone or edit your iPhone’s notes on computer, how to download Notes from iPhone to your Mac?
iPhone Transfer for Mac helps you browse iPhone/iPad notes on your Mac, MacBook or iMac. You can easily access your iOS Notes to export notes from iPhone to Mac as a text or PDF file in a few clicks. It can also save your notes attachments separately. Besides notes, iPhone Transfer for Mac can export text messages from iPhone to Mac, as well as contacts, photos, WhatsApp conversations and so on. It supports all iPhone and iPad models, such as iPhone 11 Pro, iPhone 11, iPhone Xs/XR, iPhone 8/8 Plus, iPhone 7s/7s Plus, etc. You should have a try!
محتويات
How to Transfer Notes from iPhone to Mac without iCloud
If you haven’t enabled iCloud service on your iPhone, your notes won’t be synced to iCloud automatically. In this case, if you want to download your notes from iPhone to Mac without iCloud, you are supposed to get the help of iPhone Transfer for Mac .
Step 1. Download and install iPhone Transfer
First, Download iPhone Transfer on your computer and install it.
الخطوة 2. قم بتوصيل iPhone بجهاز Mac
After installing, launch iPhone Transfer for Mac and connect your iPhone to Mac. It will automatically detect your iPhone or iPad.

Step 3. Choose Notes & Export Notes from iPhone
Select “Notes” in the left sidebar, iPhone Transfer for Mac will display all the notes on your iOS device. You can choose the notes you want to export. When you have chosen the notes, you can export them to your Mac as Text or PDF files or print iPhone notes directly.

Now you can view your iPhone notes and notes’ attachments on your Mac.
How to Transfer Notes from iPhone to Mac via iCloud
If you enable notes backup in iCloud already, you can sync your notes from iPhone to Mac using iCloud. You can download iCloud notes to computer after syncing your iPhone notes.
Part 1. How to Enable to Sync Notes in iCloud
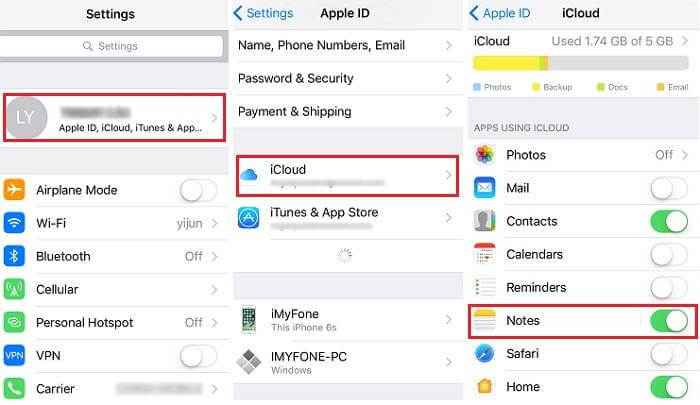
1. Go to Settings – Your Name – iCloud. (You should log in your Apple ID first)
2. Find the “Notes” option in the “APPS USING ICLOUD” list and toggle it on.

Once you have enabled Notes in iCloud, let us know how to access them on Mac.
Part 2. How to Download Notes from iCloud to Mac
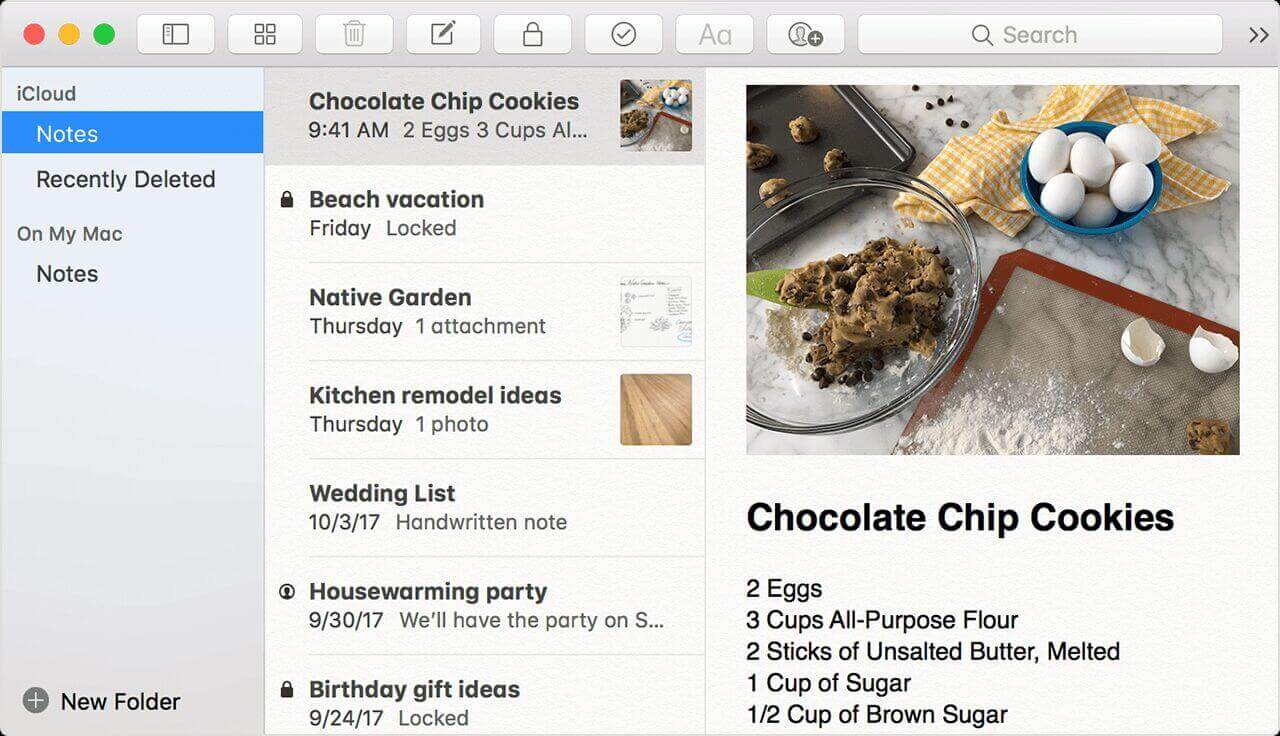
1. Open Notes app on Mac and then you can view all the notes on iCloud. (Make sure your iPhone notes have already synced to iCloud.)
2. You can choose the notes you want to transfer to Mac or export the notes in PDF files.

How to Transfer Notes from iPhone to Mac via Email
Step 1. Open your iPhone Notes app and enter the notes you want to transfer.
Step 2. Click the share button on the top right corner. You can choose which app do you want to share to. Choose “Mail” and share the notes.

This is another way for you to transfer notes from iPhone to Mac. You can share the notes one by one via Email and view the notes on Mac by logging in your Gmail, Outlook, Yahoo Mail or other emails.
خاتمة
Here are three ways to transfer notes from iPhone to Mac. Generally speaking, using iPhone Transfer for Mac is the best way to transfer the notes and save your time. You don’t need to regret that you haven’t enabled the Notes backup in iCloud, or you don’t need to download the notes one by one via Emails. If you begin to use iPhone Transfer, you can transfer almost all data from your iPhone to Mac and backup your iPhone/iPad/iPod to avoid losing your data on iDevice. Just have a try now.

