Deleting downloads on your Mac helps clear out files you no longer need, especially duplicate files on a Mac laptop that appear each time you double-click to check those files. These useless and duplicate files decrease the storage level of your Mac and hence, the Download folder has to be cleared out. It is advisable to keep important files and documents on Mac by moving them away from the Download folder. As to make deleting easier and faster, here are some steps to deleting downloads on Mac.
Contents
How to Delete Downloads on Mac in One-Click
MacDeed Mac Cleaner is an awesome Mac utility tool to clear out space and privacy on Mac to let you enjoy your life with more freedom. You can do all the cleaning and optimization of your Mac in a quick way with the help of Mac Cleaner.
Delete Unneeded Download Files on Mac
- Download and launch Mac Cleaner.
- Select “Large & Old Files“.
- Start to scan your Mac and select what you want to delete. The selection can be made by kind, size, and access date.
- Click on “Remove”.

Detele Safari, Chrome, Firefox Browsing History
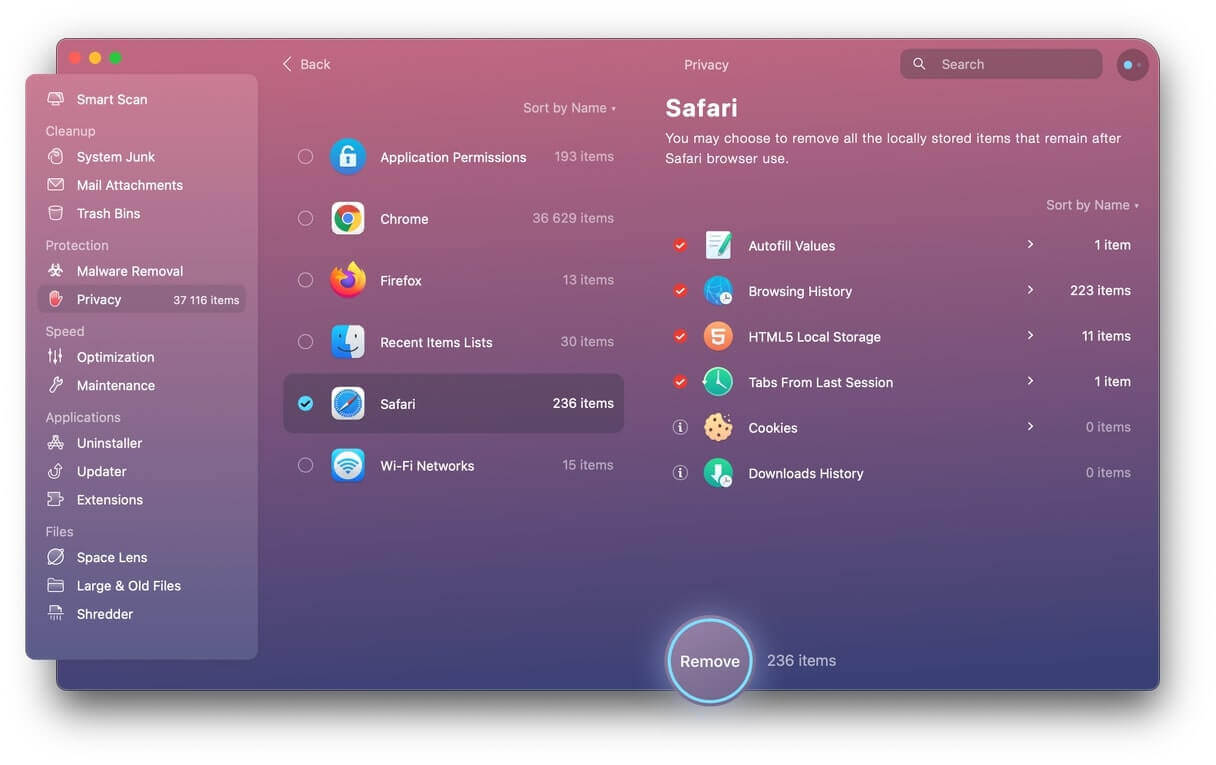
Cleaning your download history using Mac Cleaner requires a slightly different step.
- Launch Mac Cleaner on your Mac laptop.
- Select Privacy on the left sidebar.
- Select the browser you want to remove history and mark the boxes of the “Download History”.
- Then click “Remove”, located at the bottom of your screen.

Delete Mail Attachments on Mac
- Launch Mac Cleaner.
- Select Mail Attachments on the left sidebar.
- Scan all your mail downloads and attachments.
- Select the attachments you don’t need and click “Remove” to save local disk space.

How to Delete Downloads on Mac Manually
How to Delete Downloads on Mac Directly
Deleting the download folder on a Mac directly is very and requires a few steps;
- Click on the Finder located in the Dock toolbox.
- Enter the manage page and scan through to find “Downloads”. It is located on the lists on your left-hand side.
- To show all your downloaded folders, click on them.
- Now there are two things to take notes of:
· If you’re clearing all downloads at once, press “Command + A” then right-click on your mouse and select “Move to Trash”.
· If you’re being selective of what to delete, select the unwanted files one after the other, right-click and select “Move to Trash”.
How to Delete Downloads from Safari/Chrome/Firefox on Mac
Every web browser has the ability to keep records of all activities carried out on it, such as all links clicked, accounts logged in, files downloaded, and so on. This history is really helpful in times of reference and forgetfulness but it keeps your privacy at high risk. Cleaning your browser’s history and downloads also helps your Mac run smoothly because the unwanted cache files on it have been cleared out and storage becomes less used up. So, learning to clean out your browser’s history is very necessary. Each browser has its own way of wiping out its web history.
How to Delete History from Mac Safari
There are two methods used in clearing out Safari browsing history on your Mac.
Method A
- Open your Safari browser, scan through your menu bar and click on “History” and click on “Clear History…”.
- After clicking on “Clear History…”, options are brought out as to how much history you want to clear. You can select the time frame to clear the history in one of “the last hour”, “today”, “today and yesterday” or “all history”.
- Wait for less than 2 seconds and all your Safari browser history will be wiped.
Method B
- Open your Safari browser. Scan through the menu bar and click on ”History” then select “Show all History”.
- All history would be shown on your screen as a list. To select an entry, click on that entry or better still use the command key to choose more than one entry in the case of multiple-entry selection.
- Finally, to delete all selected entries, press the “delete” key on your keyboard and all selected entries would be deleted.
How to Delete History from Mac Chrome
Deleting your download folder on Google Chrome has more than one method, too.
Method A
- Go to the menu bar of Chrome browser.
- Click on history and scan through to find “Show Full History” or press “Command + Y”.
- A list of the previously visited website would appear on the screen and select the history you want to clear by checking the boxes provided right in front of each history.
- After selecting all history that you want to delete, click on “Delete” which is present on the top right-hand side of the blue bar.
Method B
- Select History on the menu bar and select “Show Full History” or use the easy command tool, “Command + Y”.
- Look to the left bar and select “clear browsing data”.
- The time frame (last hour, today, clear all history) would appear on your screen, then you select the history you want to wipe out. You can also select the kind of files you want to delete: history, images, or cookies.
How to Delete History from Mac Firefox
Firefox has the easiest method of deleting download files.
- Open your Firefox browser.
- Scan through the menu bar located at the top of your screen.
- Select history and click on clear recent history.
- You could also select a time frame and the type of file you want to delete.
To avoid clearing your download history very often, using Private Browsing or Incognito mode is the best and basically, the only option to avoid frequent cleaning. Incognito mode prevents your browser from keeping records of any entry, cache, or history.
How to Clear Downloaded Mail Attachments on Mac
The mail app on your MacBook automatically downloads all attachments you receive from your email and it will download that email so many times, this is unavoidable. So here are a few steps to cleaning unneeded attachment files gotten from your Mail on your Mac device.
- Open your Finder.
- Search for “Mail downloads”.
- Select all folders found in the Mail Downloads folder and move them to Trash, and then empty Trash bins.
Conclusion
For Macs that are used for a long time, it is very necessary to clean the Mac computer frequently to free up your Mac and improve your Mac’s performance. MacDeed Mac Cleaner is the best Mac tool that you must have for your MacBook Air, MacBook Pro, and iMac.

